Tuesday, November 17, 2009

Basic Max - Lesson 4

Splines - one of the most robust tools for advanced modeling.
The simple and most widely used is the line, since once you draw it you can modify the vertexes by coordinates.

There are a number of modifying options under the line object.
a) By  selecting the line and clicking the modify tab you can adjust each vertex by pressing 1, modify a segment by pressing 2, or the entire spline by pressing 3.


By drawing the simple lines (splines) you can then apply effects to make them 3 dimensional. The following are the most widely used modifiers that are selected from the same modifying tab that the bend/stretch and others were used from the prior lesson:

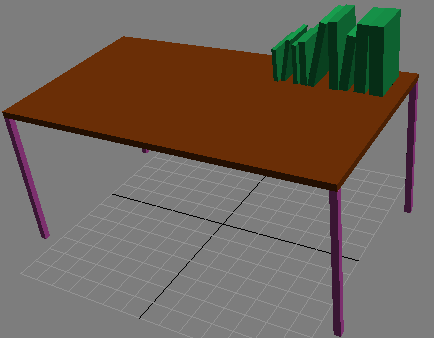
1. Extrude-pushes out a shape out of a simple object. To use this, draw any shape using a line or any spline. Next select it, go to modify tab and select the extrude function. The options for this are. Amount is the height by which the object is extruded. Segments indicates the amount of polygon layers applied the extruded surface.
A 3D object can be viewed in skeletal mode by pressing F3, by pressing F3 again it turns back to an opaque form. To show opaque and skeletal overlay press F4.

2. Lather-is another popular modifier, it is very helpful in building glasses, vases and any cylindrical object of various shape. To use it, draw a silhouette of an object you want to rotate around its axis. In this case I made a glass shape. Next, by selecting it find the modifier Lathe and apply.
Degrees specifies if you would like to rotate the object entirely around or a certain amount, in my case it is slightly cut, because the degrees are not 360.  
Weld core check box is useful to get rid of bad texturing occurring mostly at the bottom of the rotating object, where there has to be a filled surface.
Flip normals is used when the object appears completely black and no texture appears on it.
Direction indicates along which axis to apply the effect, in my case it is the y-axis.
Finally the Align indicates at which point of the drawn shape to start the rotation, by selecting each option you will understand how it affects the shape.

3. Sweep - is a useful function if you want to quickly apply a shape to a line. In this case I selected a pre-built object, a Bar. But you can apply any shape if you draw it beforehand. Basically this function takes a simple object and draws it along the specified path. By applying your own object, first draw it using splines. Then in the modify click select "Use custom Selection" and click "Pick" and click on your object. That shape will now follow the path of your original object. If you are using the predefined objects, there are a number of options you can modify such as:
Length, Width - varies the length and width parameters of the built-in object (in this case bar)
Corner Radius - smooths the applied object.
The sweep parameters allow modifying the angle and spacing of the object along the chosen path. Hence, X and Y Offset modify the spacing in those directions and the angle twists the object.

Tuesday, November 10, 2009

H/w to Basic Max - Lesson 3

For this assignment I will create a small airport scene.

We will start with how to make trees, i.e. which is really cloning of one tree. To make a simple pine tree, create 4 cones and stack them one on top of the other. The lowest cone will have a bigger radius and smaller height, the cone on top of it, will have a smaller radius than the base cone and a bigger height, the cone on top of this cone will follow this patter. This way you will have an increasing in height and decreasing in thickness cones. For the stem, create a cylinder and fit it in the center of all the cones. To add some variation to the cones, add a modifier to each of the cones, such as noise. As noted on the figure to the right.
Further, the "grass" for the scene is simply a plane colored in green and the runway with the markings is done the same way as in the second lesson exercise.


The airport tower is slightly more complex to build, but still follows basic modifiers. The base is built out of Gengon's, which you can find under "Extended Primitives". The parameters for the Gengon are shown. The antenna is a basic cone object.

The Antenna is made using a box, with three modifiers applied to it. The first one is a lattice modifier, which makes the box receive the cage like shape. Parameters shown in the picture. The next modifier is bend, which bends the object along the x-axis, and the third modifier is another bend, which bends the object along the y-axis. Hence making a somewhat parabolic shape for the antenna. The antenna receivers are basic ChamferCyl, which can be found under "Extended Primitives".

Now to the plane. This object isn't complex, more like tedious, since it consists of a lot of parts. First the upper wing. This is made out of a simple box with bend applied to it. I also applied a relax modifier to smooth the endges, however, instead of using a modifier, instead of a box, use a chamferbox with a fillet option. The main body of the plane is an extended primitive called OilTank, with a bend modifier applied to it. The wing-tips at the back of the plane are also boxes with the bend and relax modifer applied.

The white trusses holding the two wings together are basic cylinders without any modifications, as are the wheel rods.
The lower wing is also a box, with a bend and a relax modifier applied to it as in the upper wing. I also applied a spherify modifier to give it a bit of weight, since it is attached to the main body of the plane and hence, physically has more stress associated with it.


The propeller is a simple Box object with a bend applied to it, it is slightly rotated at an angle and arrayed via rotation 90 degrees along the y-axis. The propeller tip is a regular cone object with a sphere on top of it to make the tip rounder.

The wheels are made out of 2 chamfer cylinders, one for the tire, the other for the rim. The cover for the wheels is made out of a Capsule (from the extended primitives) and it is sliced in half.

The pilot is made out of a lot of small tedious pieces. The cage is made out of a box with 3 modifiers applied to it. Lattice - to make it cage like, Spherify - to give it a sphere like shape, and Slice- to have only half of the cage, since spherifying encompases 360 degrees. The base of the cage is a torus. The head of the pilot is a sphere so are his eyes.
The hat is actually a piece of a primitive tea pot. The Lid piece to be more precise. With a squeeze modifier applied to it. The nose is made out of a capsule extended primitive with a bend and a stretch modifier applies.


The a little cloning here and there and arranging carious items all over the scene, this is how the final scene looks like this:

Saturday, November 7, 2009

Basic Max - Lesson 3

Modificators:
To use a modificator, create a simple object, a cylinder, make sure you have enough Height Segments for the modifiers to work properly.

Bend - select object and click on the modify tab and then on the drop down of "Modifier List".
The options are to bend an object at a certain angle, in this case, 180 degrees and then choose the direction, in this case -30 degrees around z-axis. It also lets you change the axis along which to bend.

Also, you can use a number of modifier on one object, by again selecting it and selecting a new modifier to apply to it.


Taper - this allows the object to increase on one side and decrease on the other, hence deforming it. The same principle is used to apply taper to an object, via modify list.
Amount lets you modify the intensity of the object increase/decrease.
The curve allows the object to curve in the Effect axis, which in this case is X. The Primary axis serves the direction in which to apply the taper effect.


Twist - as the name applies, this twists the object (good for creating chandeliers, candle stands, twisted legs for a table or chair). Not a lot of tinkering around this modifier. The angle gives the angle of twist and Bias, gives the intensity of the twist. And also you have the axis around which to twist about.


Stretch - as the name implies, it stretches an object. Good in creating fat/round vases or legs for various furniture. Also, not a lot of tinkering, stretch gives the magnitude of stretching along (in this case) the z-axis. Amplify changes the middle portion of the object, either squeezing it or expanding it.When the amplification is negative, a similar effect can be achieved by the modifier Spherify.


Melt - this is a cool feature, but I find it completely useless. Perhaps its good in animations, but as far as modelling, I don't really see the use for it, other than maybe for a candle. As the name implies it make the object melt. The amount changes the intensity of melting, % of Melt changes the amount of the object melted and then there are options for various materials, i.e. Glass and ice will melt starting from the sides, while Jelly and Plastic will melt inside and outside, while keeping a partial carcass of the object.


Squeeze - finally, this modifier has a slighly more complex modification arrangement. Basically, it changes the object by squeezing one side of the object and make the volume that is being squeezed redistribute in the second part of the object. The tinkering for this is as follow: The amount changes the object to adjust either up or down. The curve changes the curveture at the top. In the radial sqeeze, the parameters change along the z-axis, i.e. make the object fatter or thinner and the curve varies the curveture along z-axis.

Sunday, November 1, 2009

H/w to Basic Max - Lesson 2

h/w build a scene using the array function.
This will be a simple scene, we will build a building with windows along a road with driving markers.

First the building:
Create a box with parameters (L/W/H) - (20/40/50), (X/Y/Z) - (0,0,0)
Next we will create windows. By selecting autogrid, draw a box on the side of the building.
The parameters should be (L/W/H) - (5/5/0.5), (X/Y/Z) - (-15,10,45)


Next, select the object and go to Tools and Array.
In the following window setup the array matrix as shown.
The first 1D - matrix specifies the number of clones in one dimension in this case the x-axis (windows in the row)
The 2D - matrix specifies cloning in the 2nd dimension, in this case the z-axis (windows up and down)
The 3D - matrix specifies cloning of the windows on the other side of the building, in this case the y axis.

Next, optional, we can create two more boxes on top of the building for elevator shafts.

Build a road:
create a box, with parameters (L/W/H) - (20/140/0.5), (X/Y/Z) - (0,20,0)
Next, with AutoGrid checked on, draw another box on top of the first one for the marker,
with parameters (L/W/H) - (1,5/8/0.1), (X/Y/Z) - (66,20,0.5). Now either array or clone the marker object along the x-axis with a distance of 11 and 13 objects.
The homework is done and this is what it looks like:

Wednesday, October 21, 2009

Basic Max - Lesson 2

How to setup units of measurement:
1. Customize
2. Units setup

How to setup grid units:
1. Customize
2. Grids & Snaps
or right click on the magnet icons.

Array - how to clone around an object.
1. Select object to make an array
2. Tools
3. Array

Align - one object to another.
1. Select object to make an array
2. Tools
3. Align
4. Click second object and then select what parameter to align.

Wednesday, October 14, 2009

H/w to Basic Max - Lesson 1

Make an office looking environment, i.e. table with books on it, a piece of paper, a pen and a lamp.

Start with making a table, as an example look at the IKEA site, say the table AMMERO, with dimensions (L/W/H) - (160/90/72):


Start off by creating an arbitrary box, click the transform tool and center it at the origin. Set, X, Y and Z coordinates to 0.


Then, click on the modify tab and adjust the size of the box to the size of the table top. I.e. (L/W/H) - (160/90/3) and raise it on the z axis to 69.


Now on to the legs. Create a random box and modify the parameters to be L/W/H - 3/3/69. And have this one leg coordinates me (X,Y,Z) - (-43.5,-78.5,0).

Now, while the object is clicked, press shift and move the object to along the x-axis. And let go. You will have a clone of the leg. Set the coordinates of the new leg to (X,Y,Z) - (43.5,-78.5,0). Now select both of the legs, press shift and drag along the y-axis. Set the coordinates to (X,Y,Z) - (43.5,78.5,0) and (X,Y,Z) - (-43.5,78.5,0) respectively.

And that's it. The table is ready.


On to books. This will be simple. Click to create a box and select AutoGrid.
Next create a box by drawing on top of the table surface. I made mine my first book with the following size and coordinates: (X,Y,Z) - (30,-70,72) and (L/W/H) - (6/20/30). Next clone the book as many times as you'd like in the Y direction. I made 8 copies (not instances or references, otherwise you can't modify each book). Next you can modify the dimensions of each book to make it more diverse. As well as rotate the object so one book leans on the other.


On to pen and paper. This will be simple, the paper will be a box on top of the table and a primitive pen will be a cylinder. To create 3 sheets of paper, first create a box on top of the table, I created the legal size paper with (X,Y,Z) - (-20,0,72) and (L/W/H) - (21.59/28/0.1). Next, clone the sheet either using the rotate or move tool. Increase the position into the Z axis by 0.1, 72.1 and slightly rotate it. Repeat with the cloning again and increase the Z axis by 0.1 to 72.2.
Next create a cylinder with (X,Y,Z) - (-30,-21,72.5) and (R/H) - (0.5/14) and rotate it along the y-axis 90 degrees.

And finally, the lamp. The lamp will have a base consisting of 2 cylinders, a rod and a cone.
The first cylinder will be the base of the lamp with (X,Y,Z) - (18,50,72) and (R/H) - (16/2).
The second cylinder is drawn on top of the first with (X,Y,Z) - (18,50,74) and (R/H) - (15/1.5).
The rod cylinder is drawn on top of the second cylinder with (X,Y,Z) - (18,50,75.5) and (R/H) - (1.5/30).
And finally the cone is drawn on top of the rod with (X,Y,Z) - (15,50,105.5) and (R1/R2/H) - (20/10/20).
And the simple lamp is complete as is the homework.


This is how the final scene looks like:

Thursday, October 1, 2009

Basic Max - Lesson 1

Hardware
CPU > 2Ghz - best if multiprocessing
RAM > 1GB
Video Card 128x960
HDD > 50% virtual memory

Some wording:
Vertex - вершинки
Edge - ребро
Face - грань

Short cuts:
Shift + Q - Rendering
Alt + W - make scene full screen

To Clone, select object, then press Shift and move the object. You can either create a:
Copy - independant object
Instance - will follow changes of the original object
Reference -  only the original can be changed
To make the cloned object a stand alone, have to go to modifications and make unique.


To move, rotate, scale object precisely, right click on the transform button (scale, rotate):


To change Pivot of an object, Select the Hierarchy tab and then change Pivot click affect pivot only, similarly to precision setup, can put the pivot by typing in numbers.