
Exposure check box. For interior, best not to use the exposure check box.
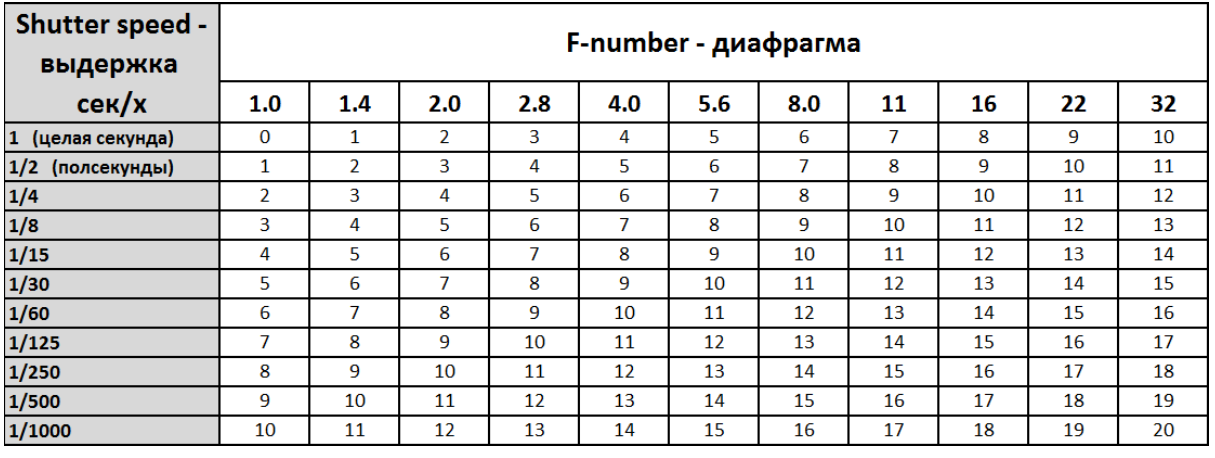
F-number - the size of the pupil size of the camera. The smaller the number, the brighter the scene.
Shutter speed - the lower the number, the brighter the scene.
The combination of F-Number and Shutter speed is called Expo value (EV). EV from 0 to 20. Where 0 is very bright and 20 very dark.
Vignetting darkens the borders of a picture.
White balance sets the temperature picture, i.e. D50-cold image (bluish), D75- very warm (redish). Neutral turns off the effect.
Depth of field option allows fading out objects in the front or back.
By checking specify focus and then setting the focus distance, we can modify which objects are distorted, i.e. in the front or in the back. To make a more proper bleack, set the Bokeh effect blades check box.
Target Directional Light - option Vray Shadows params. If you set the Area shadow check box, you will get diffuzed shadows. By modifying U size option, the lower the sharper the shadow. Also, you can increase the number of subdivs for further detail.
Under intensity/color/attenuation set the color slightly yellowish.
Next open render setup, indirect illumination, turn on GI, under V-ray irradiance map, set preset to high and check the two check boxes calc phase and direct light. Next go to V-ray tab and open vray environment.Turn on GI environment and set multiplier 0.5. By setting sky multiplier to 0.6 and direct light to 1.3 will make higher contrast.
For final renders (for exterior scenes mostly) (best quality-very long). This option is good because it is perfect where you don't have to modify subdivs.
1. Set picture size to a high size.
2. Got to Vray tab option Vray: Image Sampler. Set image sampler to Adaptive DMC. In DMC settings, set min subdivs to 1 and max subdivs to 100.
3. In Setting tab, go to Vray: DMC Sampler. Set Adaptive amount to 1. (this allows the amount of subdivs to render, by setting to 1 it allows DMC to work at max.) Now to Noise threshold, the lower the number, the better the quality. The best quality is 0.001. For commercial use, 0.003 or 0.005.

Global Illumination:
In architectural drawings, the picure must show ideal vertical lines. For this, in the vray camera view, click Guess vert button.
Set a VrayLight. And then in Rendering setup, set colormapping to Reinhard with burn of 0.3
GI is not a source light, it allows otherlights to bounce from other objects.
Go to Indirect Illumination and turn it on. GI Engine option in Primary bounces-is the very first reflection of the light, Secondary bounces measures all the rest of the light bounces.
Brute force option - the most accurate light calculating method, which calculates each light ray. Has lower calculation time, has the highest detail, but has a lot of fuzz.
Irradiance map option - uses a certain number of rays and then an interpolation is used to come up with the average. Has medium calculation time, has the medium detail, but has the best fuzz elimination. However, it only has 1 light bounce. Hence it cannot be used in Secondary bounce. If you go to Vray setup into Irradiance map option, the custom preset of VERY HIGH will allow calculation of the finest detail. However, the higher the preset the less blending action. I.e. picture will be very sharp. Hence, Medium would work best in interiors.
If you have primiary bounes as irradiance and secondary as brute force, the result will be a bit patchy, with fuzz.
A better way to do it is using Photon map as a secondary, however, it had some downside.

The optimal GI engine for secondary is to use Light Cache.
Light Cache is the faster calculation method, bad detail, but medium fuzz.

Turn it on as a secondary, scroll down to the Light Cache option. The only option that makes sense to modify is Subdivs. 500 is enough for small size pictures. Switch on Show calc phase and pre-filter.
Light Cache has a peculiarity, the light bounces about 100 times, compared to brute force of 3. Hence, you have to lower the multiplier of Light cache to about 0.95.
To make church type stained glass that shines. Create a material, apply the VrayLight material, and at the right of multiplier, apply a bitmap of the stained glass.
The final render with textures and lit stained glass looks like this:

No comments:
Post a Comment